Data Validation with Constraints
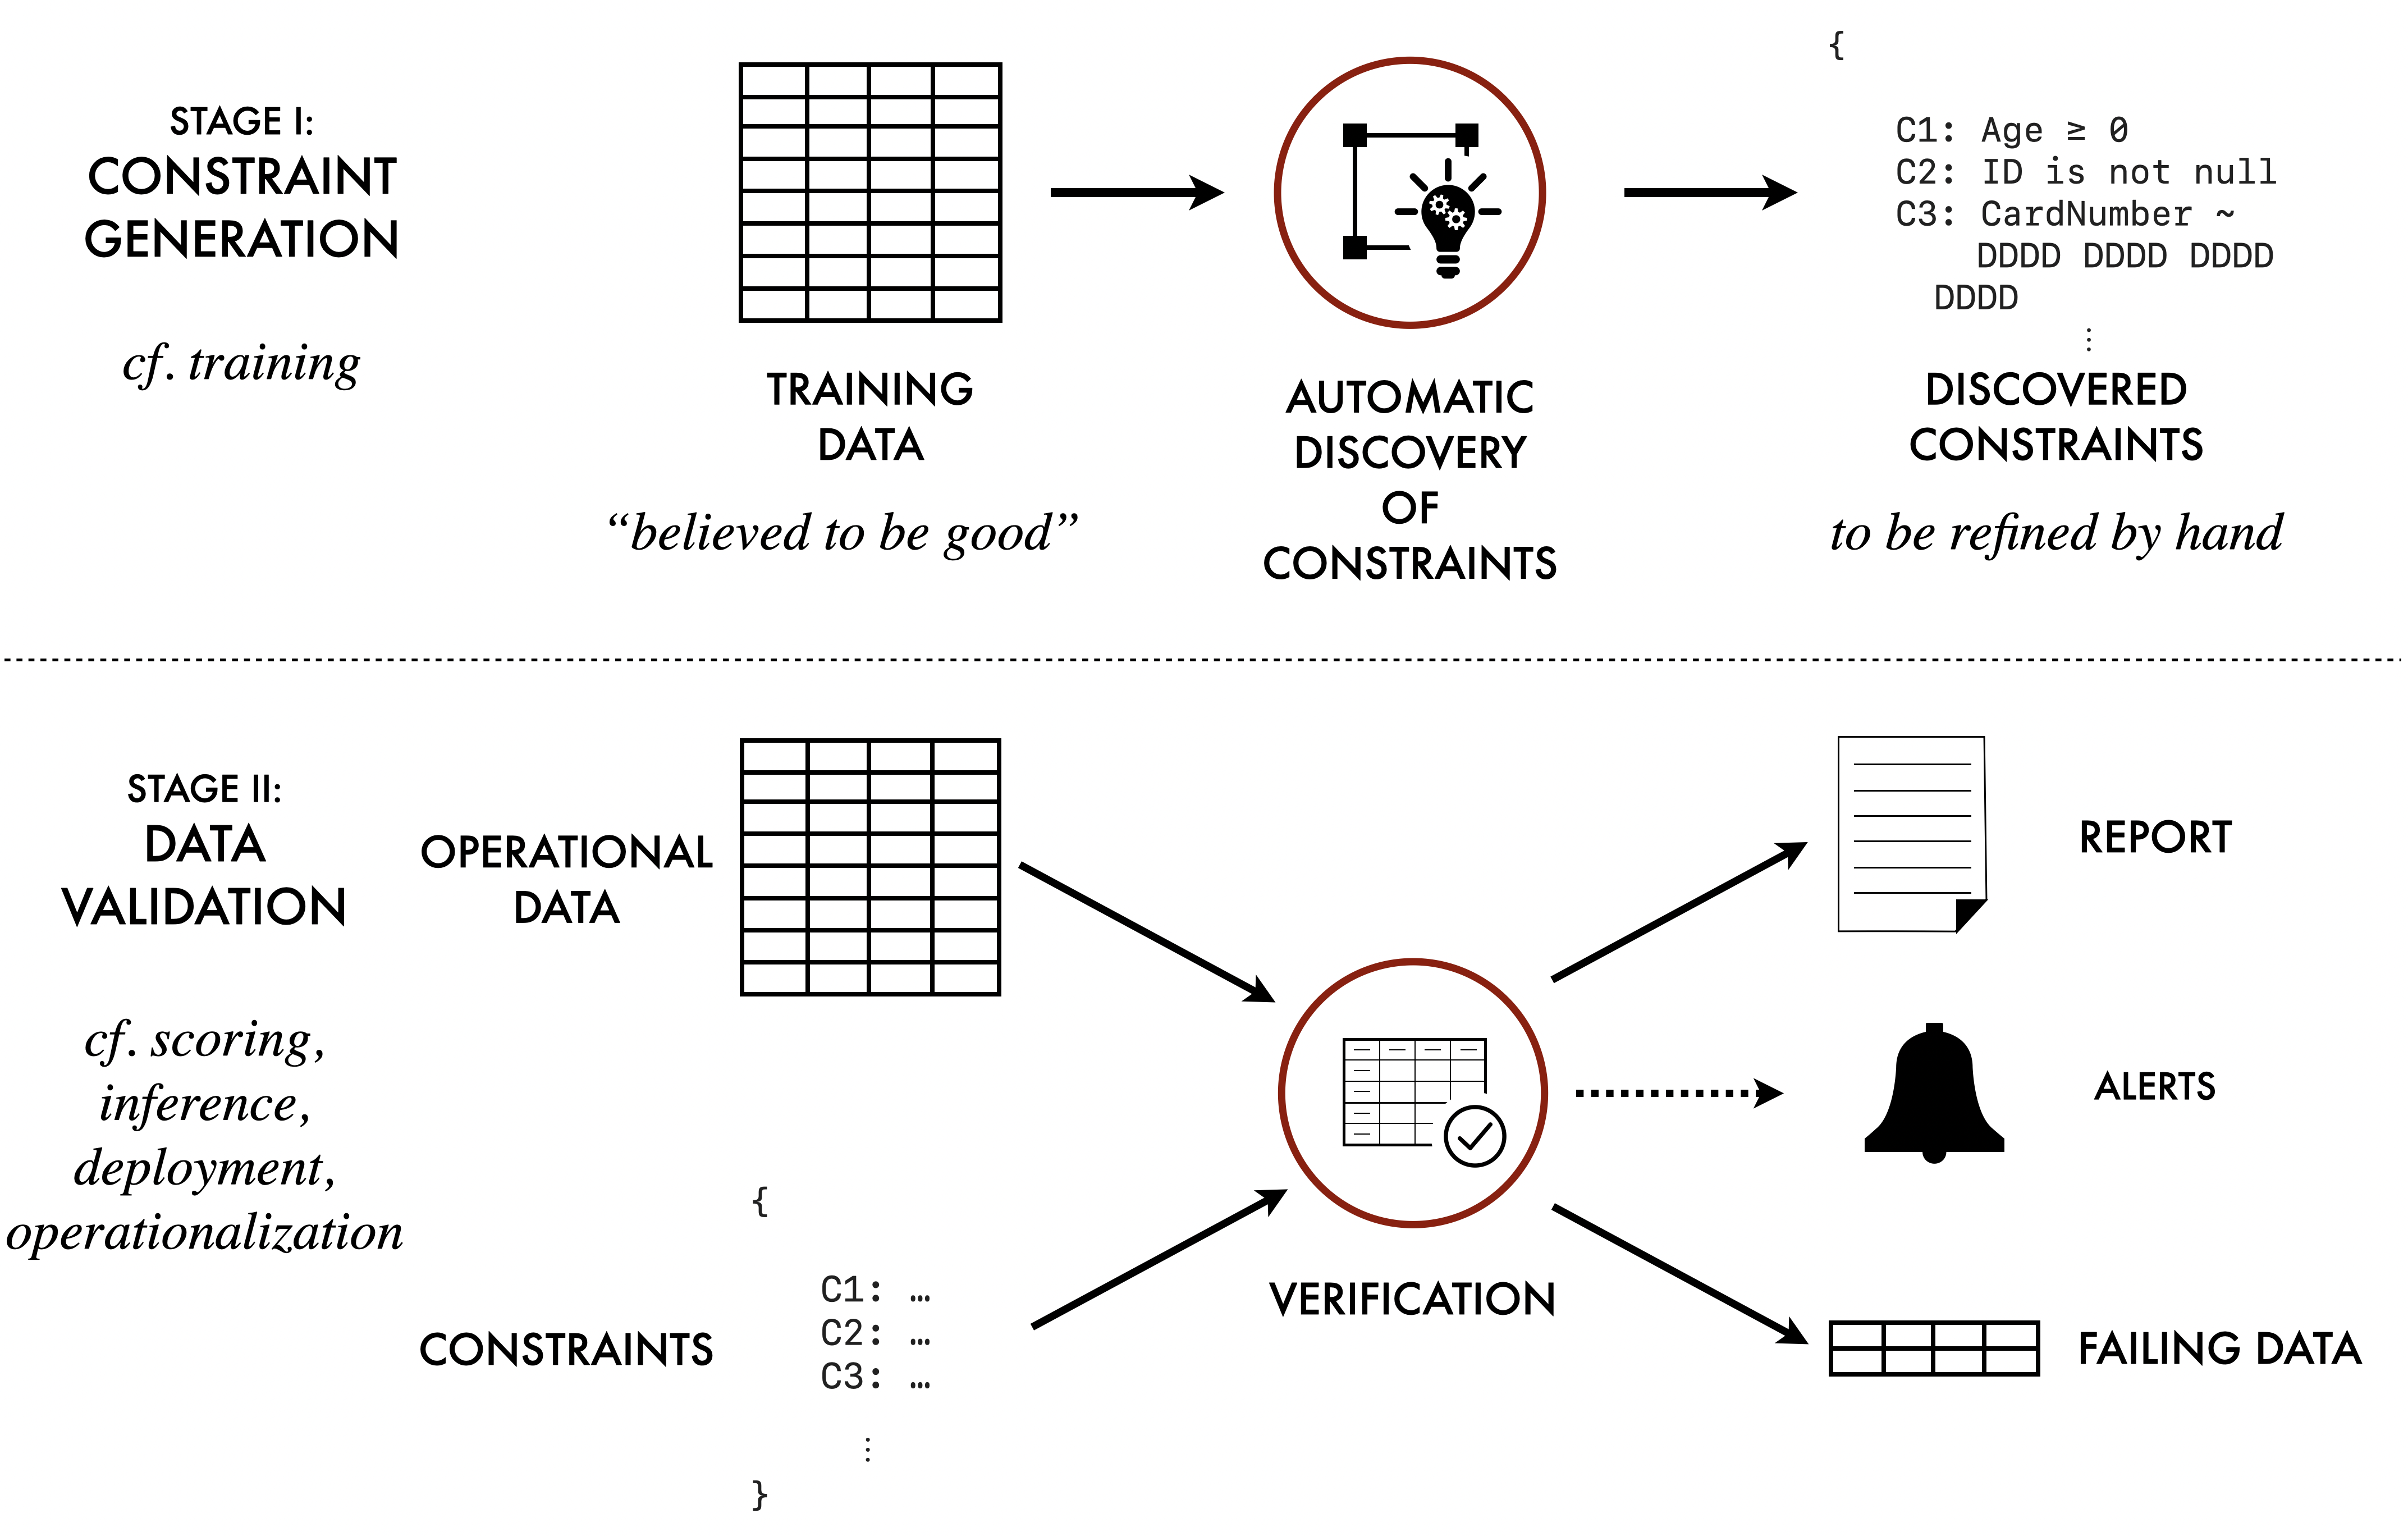
The TDDA library provides support for constraint generation,
data validation (verification) and anomaly detection for datasets,
including .csv and other flat files, Parquet files, and Pandas DataFrames.
(Support for Polars dataframes is planned; most of the rest of
tdda already supports Polars)
The module includes:
The
tddacommand-line tool for discovering constraints in data, and for verifying data against those constraints, using the TDDA JSON file format (.tddafiles).A Python
tdda.constraintslibrary containing classes that implement constraint discovery and validation, for use from within other Python programs.Python implementations of constraint discovery, data validation (verification), and anomaly detection for a number of data sources:
.csvand other flat filesPandas and R DataFrames saved as
.parquetfilesPostgreSQL database tables (
postgres:)MySQL database tables (
mysql:)SQLite database tables (
sqlite:)MongoDB document collections (
mongodb:; partial support)
Note
To use databases, you may need to install extra optional packages. See Optional Installations for using Databases.
For a much more detailed tutorial introduction on using TDDA for data validation, read chapter 1-7 of the book.
The tdda Command-line Tool
The tdda command-line utility provides a tool for discovering constraints
in data and saving them as a .tdda file in the
TDDA JSON file format, and also for verifying data against constraints stored in a .tdda file.
It also provides some other functionality to help with using the tool. The following command forms are supported for data validation:
tdda discover— perform constraint discovery.tdda verify— verify data against constraints.tdda detect— detect anomalies in data by checking constraints.tdda examples— generate example data and code.
See Examples for more detail on the code and data
examples that are included as part of the tdda package.
See Tests for more detail on the tdda package’s own tests,
used to test that the package is installed and configured correctly.
tdda discover
The tdda discover command can generate constraints for data,
and save the generated constraints as a
TDDA JSON file format file (.tdda).
Usage:
tdda discover [FLAGS] input [constraints.tdda]
inputis one of:a
.csvfile or other flat file (which can have associated metadata)a
-, meaning that a.csvfile should be read from standard inputa
parquetfile containing a DataFrame, with extension.parqueta database table
constraints.tdda, if provided, specifies the name of a file to which the generated constraints will be written.
If no constraints output file is provided, or if - is used,
the constraints are written to standard output (stdout).
Optional flags include:
-ror--rex, to include regular expression generation-Ror--norex, to exclude regular expression generation
See Constraints for CSV Files and Pandas DataFrames
for details of how a .csv file is read.
See Constraints for Databases for details of how database tables are accessed.
See the tdda discover man page for more details
on options.
tdda verify
The tdda verify command is used to validate data from various sources,
against constraints from a
TDDA JSON file format constraints file.
Usage:
tdda verify [FLAGS] input [constraints.tdda]
inputis one of:a flat file (e.g.
.csv), which can have associated metadataa
-, meaning it will read a flat file from standard inputa
parquetfile containing a DataFrame, with extension.parqueta database table
constraints.tdda, if provided, is a JSON.tddafile containing constraints.
If no constraints file is provided and the input is a flat file,
a constraints file with the same path as the input file, but with a .tdda
extension, will be used.
For database tables, the constraints file parameter is mandatory.
Optional flags include:
-a,--all
Report all fields, even if there are no failures-f,--fields
Report only fields with failures-7,--ascii
Report in ASCII form, without using special characters.--epsilon E
Use this value of epsilon for fuzziness in comparing numeric values.--type_checking strict|sloppy
By default, type checking is sloppy, meaning that when checking type constraints, all numeric types are considered to be equivalent. With strict typing,intis considered different fromreal.
See Constraints for CSV Files and Pandas DataFrames for details of how a flat file is read.
See Constraints for Databases for details of how database tables are accessed.
See the tdda verify man page
for more details on options.
tdda detect
The tdda detect command is used to detect anomalies on data,
by checking against constraints from a
TDDA JSON file format constraints file.
Usage:
tdda detect [FLAGS] input constraints.tdda output
inputis one of:a flat file (e.g.
.csv), which can have associated metadataa
-, meaning it will read a flat file from standard inputa
parquetfile containing a DataFrame, with extension.parqueta database table
constraints.tdda, is a JSON.tddafile containing constraints.outputis one of:a
.csvfile to be created containing failing recordsa
-, meaning it will write the.csvfile containing failing records to standard outputa
parquetfile with extension.parquet, to be created containing a DataFrame of failing records
If no constraints file is provided and the input is a flat file,
a constraints file with the same path as the input file, but with a .tdda
extension, will be used.
Optional flags include:
-a,--all
Report all fields, even if there are no failures-f,--fields
Report only fields with failures-7,--ascii
Report in ASCII form, without using special characters.--epsilon E
Use this value of epsilon for fuzziness in comparing numeric values.--type_checking strict|sloppy
By default, type-checking is sloppy, meaning that when checking type constraints, all numeric types are considered to be equivalent. With strict typing,intis considered different fromreal.--write-all
Include passing records in the output.--per-constraint
Write one column per failing constraint, as well as then_failurestotal column for each row.--output-fields FIELD1 FIELD2 ...
Specify original columns to write out. If used with no field names, all original columns will be included.--index
Include a row-number index in the output file. The row number is automatically included if no output fields are specified. Rows are usually numbered from 1, unless the (parquet) input file already has an index.
If no records fail any of the constraints, then no output file is created (and if the output file already exists, it is deleted).
See Constraints for CSV Files and Pandas DataFrames for details of how a flat file is read.
See Constraints for Databases for details of how database tables are accessed.
See the tdda detect man page for more details
on options.
Constraints for CSV Files and Pandas DataFrames
If a flat file (.csv or other) is used with the tdda
command-line tool, it will by default be read using
tdda.serial.csv_to_pandas, which calls
pandas.read_csv with modified default settings and performs
date inference itself.
The tdda.serial colon format
can be used to supply metadata describing the flat file, allowing more
accurate reading (types, separators, encodings, and so on).
Constraints for Databases
When a database table is used with any tdda command-line tool,
the table name (including an optional schema) can be preceded by
DBTYPE chosen from postgres, mysql, sqlite or
mongodb:
DBTYPE:[schema.]tablename
The following example will use the file .tdda_db_conn_postgres from your
home directory (see Database Connection Files), providing
all of the default parameters for the database connection.
tdda discover postgres:mytable
tdda discover postgres:myschema.mytable
For MongoDB, document collections are used instead of database tables, and a document can be referred to at any level in the collection structure. Only scalar properties are used for constraint discovery and verification (and any deeper nested structure is ignored). For example:
tdda discover mongodb:mydocument
tdda discover mongodb:subcollection.mysubdocument
Parameters can also be provided using the following flags (which override
the values in the .tdda_db_conn_DBTYPE file, if provided):
--conn FILE
Database connection file (see Database Connection Files)--dbtype DBTYPE
Type of database--db DATABASE
Name of database to connect to--host HOSTNAME
Name of server to connect to--port PORTNUMBER
IP port number to connect to--user USERNAME
Username to connect as--password PASSWORD
Password to authenticate with
If --conn is provided, then none of the other options are required, and
the database connection details are read from the specified file.
If the database type is specified (with the --dbtype option, or by
prefixing the table name, such as postgres:mytable), then a default
connection file .tdda_db_conn_DBTYPE (in your home directory) is used,
if present (where DBTYPE is the name of the kind of database server).
To use constraints for databases, you must have an appropriate DB-API (PEP-0249) driver library installed within your Python environment.
These are:
For PostgreSQL:
pygresqlorPyGreSQLFor MySQL:
mysql-connector-pythonormysqlclientFor SQLite:
sqlite3For MongoDB:
pymongo
Database Connection Files
To use a database source, you can either specify the database type
using the --dbtype DBTYPE option, or you can prefix the table name
with an appropriate DBTYPE: (one of the supported kinds of database
server, such as postgres).
You can provide default values for all of the other database options in
a database connection file .tdda_db_conn_DBTYPE, in your home directory.
Any database-related options passed in on the command line will override the default settings from the connection file.
A tdda_db_conn_DBTYPE file is a JSON file of the form:
{
    "dbtype": DBTYPE,
    "db": DATABASE,
    "host": HOSTNAME,
    "port": PORTNUMBER,
    "user": USERNAME,
    "password": PASSWORD,
    "schema": SCHEMA,
}
Some additional notes:
All the entries are optional.
If a
passwordis provided, then care should be taken to ensure that the file has appropriate filesystem permissions so that it cannot be read by other users.If a
schemais provided, then it will be used as the default schema, when constraints are discovered or verified on a table name with no schema specified.For MySQL (in a
.tdda_db_conn_mysqlfile), theschemaparameter must be specified, as there is no built-in default for it to use.For Microsoft Windows, the connector file should have the same name as for Unix, beginning with a dot, even though this form of filename is not otherwise commonly used on Windows.
TDDA JSON file format
A .tdda file is a JSON file containing a single JSON object of the form:
{
    "fields": {
        field-name: field-constraints,
        ...
    }
}
Each field-constraints item is a JSON object containing a property for
each included constraint:
{
    "type": one of int, real, bool, string or date
    "min": minimum allowed value,
    "max": maximum allowed value,
    "min_length": minimum allowed string length (for string fields),
    "max_length": maximum allowed string length (for string fields),
    "max_nulls": maximum number of null values allowed,
    "sign": one of positive, negative, non-positive, non-negative,
    "no_duplicates": true if the field values must be unique,
    "allowed_values": list of distinct allowed values,
    "rex": list of regular expressions, to cover all cases
}
It may also include a dataset section with
allowed_fields or required_fields, or both.
By default, this looks like this:
"dataset": {
    "allowed_fields": [],
    "required_fields": [
        "*"
    ]
}
The allowed_fields section is a list of fields
that are allowed to be present in the dataset to be validated,
in addition to those listed in the fields section.
(It makes no sense not to allow fields with constraints
in data, so those are implicitly allowed.)
The wildcards * (for any substring) and ? (for any single character)
are allowed, so it would be possible to use
"allowed_fields": ["checksum", "sha*"]
to allow checksum and any field starting sha in the validation
data, or "allowed_fields": "*" (or ["*"]) to allow any extra fields.
The required_fields section specifies fields that must be present
in the data that is checked. It can also use wildcards, but these
now operate only over the fields listed. The default value ["*"]
means that all listed fields are required. If only a subset are required,
they can be listed explicitly or using wildcards. So
"required_fields": ["checksum", "sha*"]
would mean that the checksum field (which should be among those
in the fields section) and any fields in the fields section starting
sha are required in data when it is validated.
Supplied Constraints Examples
The tdda.constraints module includes a set of examples.
To copy these constraints examples, run the command:
tdda examples constraints
A directory constraints_examples will be created (or overwritten)
in the current directory.
Alternatively, you can copy all examples using the following command:
tdda examples
which will create a number of separate subdirectories.
For all of these examples, you should run commands on the command line,
after changing to this directory with cd.
Command-line Periodic table examples ("elements" dataset)
Generate constraints from first 92 elements in periodic table.
tdda discover testdata/elements92.csv elements92.tdda
This reads data from
testdata/elements92.csv, and writes out discovered constraints toelements92.tdda.The discovered constraints describe the training data. They are a starting point, not a finished product. Before using them to validate new data, it is worth reviewing them and applying domain knowledge.
For example, the
max: 92onZis an artefact of our sample: the periodic table currently has 118 known elements, and the maximum atomic number is a property of physics, not of our dataset. Similarly, themaxonAtomicWeightreflects the heaviest element in our sample (Uranium, Z=92), andNamehasmax_length: 12— but Rutherfordium (Z=104) has 13 letters. These constraints will generate spurious failures the moment we see heavier elements.A sensible response here is to remove the
maxonZandAtomicWeightentirely, and to relaxmax_lengthonName. A pre-edited version with these adjustments is provided astestdata/elements92_refined.tdda.Verify the same data against those constraints. (This, of course, should be successful.)
tdda verify testdata/elements92.csv elements92.tdda
Now try verifying a more complete version of the periodic table (the first 118 elements) against the same constraints file:
tdda verify testdata/elements118.csv elements92.tdda
Now we get some failures. For example, the original discovered highest atomic number of Z=92 is not satisfied in the expanded data.
Detect using the first 118 elements, using the constraints generated from the first 92 elements. This will write out a new csv file containing just the (27) records that had values that failed the constraints.
tdda detect testdata/elements118.csv elements92.tdda elements118_detect.csv
The example data includes
elements118.tdda, a TDDA file generated from all 118 elements. You can verify that these constraints are satisfied by the larger dataset by runningtdda verify testdata/elements118.csv elements118.tdda
Now try verifying the 118-element data against the refined constraints from step 1, which have had the sample-artifact maxima removed:
tdda verify testdata/elements118.csv testdata/elements92_refined.tdda
Fewer failures should remain—only those reflecting genuine differences between the lighter and heavier elements (such as unmeasured physical properties for superheavy elements).
Command-line bank account data examples ("accounts" dataset)
This can be used in the same way as the "elements" example above, but is more interesting as there is more data, and this data also includes dates and categorical values.
These examples also include constraints for regular expressions on string
fields. The two main datasets are accounts1k.csv and accounts25k.csv.
The equivalent steps to the "elements" ones above are:
Generate constraints using a small sample (1000 records).
tdda discover -x testdata/accounts1k.csv accounts1k.tdda
As with elements, the discovered constraints are a starting point. Again, there are obvious weaknesses with the constraints generated.
Date ranges: The
maxdates onopen_dateandclose_dateare the latest dates in the training sample. Any new account opened after that date will fail the constraint — which is clearly wrong. Remove them (or convert to a constraint that it isn't in the future; see the book). Themindates should reflect when the bank opened (which is October 2001), not the earliest date in the sample.Account numbers: The
min(10,000,801) andmax(12,994,290) are the actual extremes in the sample. It is more meaningful to round these to domain-appropriate bounds: for example,min: 10000000andmax: 19999999, on the basis that all account numbers appear to be eight-digit numbers starting with 1.Duplicates: The constraints disallow duplicate email addresses, phone numbers, and postcodes, because none appeared in the training sample. But a customer might hold multiple accounts, and many accounts will share a postcode, so duplicates are expected in a larger dataset. Remove
no_duplicatesfromemail,home_tel,mobile_tel, andpostcodeunless shared email across accounts is not allowed.Tightening allowed values: Constraints sometimes need tightening, not just relaxing. The
titlefield hasallowed_valuescontaining"M", which is not a standard UK title. For a UK bank, domain knowledge tells us to remove it. The refined allowed values areDr,Miss,Mr,Mrs,Ms, andProf.String length maxima: Like date maxima,
max_lengthon free-form string fields such asemailsimply reflects the longest value seen in the sample. Remove it or extend it to a generous bound, or any new record with a longer-than-observed value will fail.Redundant regex: Where
allowed_valuesis generated (as fortitleandaccount_type), anyrexconstraint is redundant — if the value is in the allowed list it will already match the pattern. Therexconstraints can safely be removed.
A refined version incorporating these changes is provided as
testdata/accounts1k_refined.tdda. Note that because we have tightened thetitleconstraint beyond what the training data satisfies, verifying the training data against the refined constraints will itself show a failure—which is exactly the point.Verify the same data against those constraints.
tdda verify testdata/accounts1k.csv accounts1k.tdda
Verify against a larger dataset (25,000 records), using the constraints generated on the 1,000 record sample.
tdda verify testdata/accounts25k.csv accounts1k.tdda
Detect against the larger dataset, to produce a new csv file that contains just the records that failed the constraints.
tdda detect testdata/accounts25k.csv accounts1k.tdda accounts25k_detect.csv
Verify constraints built from the larger dataset, against the larger dataset (which should all pass).
tdda verify testdata/accounts25k.csv accounts25k.tdda
Now verify the larger dataset against the refined constraints from step 1:
tdda verify testdata/accounts25k.csv testdata/accounts1k_refined.tdda
Compare the failures with those from step 3. Failures from sample artifacts (date ranges, duplicate phone numbers, emails and postcodes) should be gone; what remains is more likely to reflect genuine data quality issues.
Python API Periodic table examples ("elements" dataset)
For embedding constraint discovery and verification within a Python environment, Python API examples are provided which carry out the same steps as the command-line example steps above, but with each step explicitly implemented using custom Python code, using the API.
The steps here are equivalent to steps 1 to 5 using the tdda command
in the "elements" section above:
python elements_discover_92.pypython elements_verify_92.pypython elements_verify_118_against_92.pypython elements_detect_118_against_92.pypython elements_verify_118.py
Python API Bank Accounts Data examples ("accounts" dataset)
For embedding constraint discovery and verification within a Python environment, Python API examples are provided which carry out the same steps as the command-line example steps above, but with each step explicitly implemented using custom Python code, using the API.
The steps here are equivalent to steps 1 to 5 using the tdda command
in the "elements" section above:
python accounts_discover_1k.pypython accounts_verify_1k.pypython accounts_verify_25k_against_1k.pypython accounts_detect_25k_against_1k.pypython accounts_verify_25k.py
Note: step 3 uses the pre-built testdata/accounts1k.tdda rather than
the accounts1k.tdda generated by step 1. You could use either; the
pre-built version is provided for convenience.
Creating DataFrame Output from Verifications
The elements examples just generate textual output with ticks and crosses for each constraint for each field and a summary of the total number of passes and failures.
It is also possible to generate a Pandas DataFrame containing the pass/fail information. This is done in the "simple" examples below:
Run
python simple_discovery.py
to generate a TDDA file (
example_constraints.tdda) for the following, tiny, generated dataset:a b 0 1 one 1 2 two 2 9 NaN
Verify a smaller DataFrame that is consistent with the constraints, namely:
    a    b
 0  2  one
 1  4  NaN
by running:
python simple_verify_pass.py
This shows the same textual summary of passes and failures, but also generates and displays a DataFrame with one row per field (i.e., one for Field a and another for Field b) and a column for each constraint. The values in the DataFrame are
True: if the constraint existed and was satisfiedFalse: if the constraint exists and was not satisfiedNaN: if that constraint was not generated for that field(There are also columns for numbers of passes and failures.)
Now repeat the exercise with another small DataFrame that is not consistent with many of the generated constraints, namely:
       a      b
 0   0.0    one
 1   1.0    one
 2   2.0    two
 3  10.0  three
 4   NaN    NaN
Test this by running
python simple_verify_fail.py
There should be 7 passes and 6 failures.
For much more depth on using constraints for validation, read the book Test-Driven Data Analysis, by Nicholas J. Radcliffe, particularly chapters 2 and 4–7. It is available at all good booksellers and all sellers of good books. It is also available, over time, free, online at https://book.tdda.info.